February 26, 2013

Put Your Big Girl Panties on, and Stop Whining!


To stop whining and acting like a grown up lady was one of my Out With The Old and In With The New Swap partner’s New Year’s resolution. My swap partner name Nicole also wanted to go to the gym more and save money since she was recently engaged. From the three resolutions she gave me I had to choose one to make her something for this swap. The stop whining and acting like a grown up lady resolution seemed to be the most challenging and fun. After brainstorming many ideas, I came up with this funny encouraging frame to help remind Nicole to stop whining.


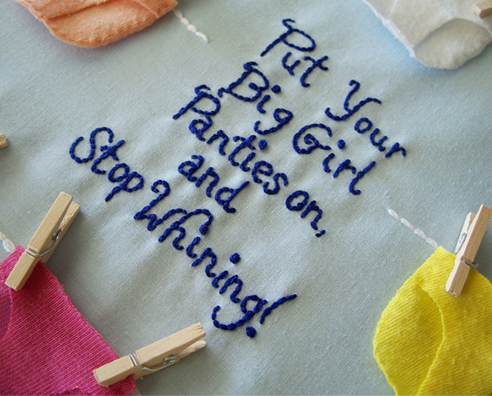
I took pictures of the process of making the frame. I hand sewed eight mini panties out of old t-shirts, all different colors and fabric. I embroidered my favorite part of the frame, the saying – “Put Your Big Girl Panties on, and Stop Whining!” I positioned the mini underwears were I wanted them and marked were I planned to embroider the clothesline. I embroidered the clothesline with white embroidery thread and glued the clothespins holding the underwear with a hot glue gun.

For this swap project we had to incorporate at least two unwanted craft supplies from our own personal materials. I already owned the old t-shirts used for the mini panties, I had the blue fabric from my thrift shopping trips, and I also owned all the embroidery thread used. The only items I purchased were the clothespins and the frame. The main idea of “Out With The Old and In With The New Swap" was for us to use our old items and make something new out of them for someone else.


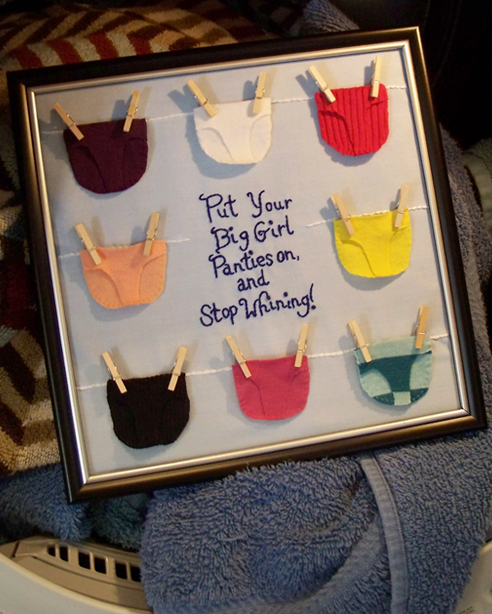
“LOVE IT SOO CUTE,” was Nicole’s reaction when she received her frame. I’m thrilled she loved it and like all my babies, my handmade creations, it was hard to see it go. I still have supplies left over from this swap project and plan to make one soon and sell it on my Etsy shop. No need to get your panties in a twist. You can own a Stop Whining frame like Nicole too.

Check out the other awesome Out With the Old and In With The New Swap creations at Bee Creative Swaps on Facebook.

February 25, 2013

DIY Mini Piñata Candy Jar


The weather was going to be cold outside; it wasn’t a kid’s party though others can say otherwise, and I wanted Mexican candy for my “Celebrate Life Frida Kahlo style” birthday party and making mini piñata candy jars instead of purchasing a big piñata was the perfect solution.

Save a piñata and make a candy jar. The piñata will be glad, for other reasons, and so will you!

Supplies: Empty sauce jars, green scrubber sponge, spray paint, cardstock/cereal box, masking tape, craft glue, paintbrush, scissors, pencil, assortment of colorful tissue paper, glue gun, and candy of your choice.


Dale 1 (Dale means hit in English. Dale comes from the Mexican song the crowd sings while someone is hitting the piñata): Wash the sauce jars out and use a green scrubber sponge to remove the sticking glue left on the jar from the jar label.

Dale 2: Spray paint the lids. My firefighter spray-painted mine. I’m a bad spray painter.

Dale 3: Make your mini piñatas. I can’t take credit for this step. I used CampFire Chic blog and Oh Happy Day blog to help me make the mini piñatas. Make your piñatas your own. I added googly eyes and a hemp saddle to my donkeys.


Dale 4: Glue mini piñata onto jar lid with your hot glue gun.

Dale 5: Put candy in jars. You know you’ll have a candy while stuffing the jars. I did.

Mini piñata candy jars also make great centerpieces and the perfect party in a jar to give as a birthday gift with the recipient's favorite candy.

February 19, 2013

DIY Viva La Vida Watermelon Invitations


Frida Kahlo’s still life painting of watermelons inspired my birthday party invitations. Incorporating as many Frida and Mexican aspects to my party was my goal. Many beautiful objects made in Mexico are colorful and hand embroidered, I decided to take the embroidered part for my party invitations and embroider Viva La Vida on watermelon slice note cards.


Supplies: watermelon slice note cards (got mine at Target), seam ripper, pencil, cutting board (or thick card board), white embroidery thread and needle.


Slice 1: Open the card and write VIVA LA VIDA in all caps with your pencil on the front of watermelon note card.

Slice 2: Place card on cutting board and use your seam ripper to punch holes were each letter connects or curves.


Slice 3: Using four strands, connect the dots with your embroidery thread and needle.  When you get to the i make a French Knot for the dot. First knot goes inside the card, stitch your words, and the last knot is also tied inside.


Slice 4 (Optional if not too full): Draw glove holding ribbon inspired by a self-portrait of Frida. Write guests name in ribbon. Behind each envelope write a quote by Frida. Seal envelopes with fruit stickers.


Slice 5: Enjoy (not that way, it’s not edible) mailing out the invitations or personally handing them out and seeing your guests’ reactions when they see how deliciously cool the invitations look.

February 16, 2013

I’m Getting Ready For My Party


I really am getting ready for my party today, with a unibrow and all. My “Celebrate Life Frida Kahlo style” party that is! I’ve been wanting to through this party for a very long time. I wanted to have it for my 30th birthday last year but since I was taking a fulltime Phlebotomy class I couldn’t. The whole planning process has been very enjoyable and I can’t wait to celebrate with family and family with some Mexican food, Margaritas, Mexican Bingo, painting, a Frida Kahlo costume contest, and mucho mucho mas (lots more)!

And you’re invited to the party too! Well, more like an after party. I’ll be posting tutorials, recipes, links to helpful websites and blogs, and pictures of the party throughout this week. Hopefully, it will make you feel like you were there celebrating with me. To spice things up, I’ll have a contest too. You’ll need to freshen up on your Frida Kahlo though.

Off I go. My guests are due to arrive soon!

February 9, 2013

Thirty One


A week ago, Saturday, February second, I turned thirty for the second time. Fine! I’ll say it! I turned thirty-one! Ahhh! This year for my birthday I made sure I requested the day off from work, even if that meant staying at home doing nothing. After dealing with upset customers on my birthday pervious years, I refused to work on my birthday again if I didn’t have to.

On my birthday, my family and friends made me feel special. My facebook became popular. Whose doesn’t on his or her birthday with corner reminders on facebook that it’s someone’s birthday. Which is alright by me because I tend to have a crappy memory when it comes to remembering birth dates. I got texts, calls, and Happy Birthday songs got left on my cell phone. For lunch my best bud Pam took me to Souplantation, where I tired to taste all the soups they had. I had two more left to go, but stopped to leave room for dessert. It was my first time there and I don’t do well at buffets because I try to eat everything. Driving back home, Pam said she felt bad letting me go home so early on my birthday and without having a drink. It was 8 pm and we stopped by my favorite Mexican restaurant, La Casita, and had my favorite margarita, Coronarita. Around 9:30pm, I started feeling my age. My stomach was aching because of all the food I ate and I couldn’t even eat my free birthday cake. Sad to say, I was ready to go home. My plan was to crawl into bed and watch a movie but I ended up saying up until 1am working on a swap piece while watching “Pitch Perfect” in the living room. There is no other way I could have imagined my birthday. Phone calls as far as Spain, lunch with a good friend, my favorite drink, and ending the night with what I love to do best – crafting. Let’s not forget the cherry on top, and no mean customers!

Some pictures of gifts I got before and after my birthday from people that love me!


Thirty-five homemade Day of the Dead inspired cupcakes made by my work pal Ms. Thayer and her sister Tawnya. The only card I got from my favorite aunt Rosa. She has never missed a birthday. McDonald breakfast from work pal Maria. Frida Kahlo themed tea lights made by Amanda for my Frida Kahlo themed birthday party, a week away!

February 2, 2013

Day 12: Ugly Christmas Sweater


Today, I end my twelfth day of Creative Christmas with an item I made for myself. My firefighter tends to wait for the last minute for things, so it’s no wonder that he waited the weekend before his ugly work Christmas sweater party to search for sweaters. We hit all the local thrift stores and nada (nothing). The next best thing was to make our own ugly Christmas sweaters. I was going to borrow a friend’s homemade ugly Christmas sweater but my firefighter looked so animated about making his own sweater, as we purchased his supplies at Michael’s, that I decided to make one too. I didn’t want to miss out on the creative fun.

It took me about seven hours to make my ugly Christmas sweater, of a perverted reindeer with a light up nose. During those seven hours I didn’t eat. Truly, I think they call artists starving artists because they are in a creative zone and don’t want to stop until their piece is complete. That’s what happened to me.

My reindeer was made out of felt and it was all hand sewn. The teeth are embroidered and I used big jingle bells for the reindeer’s collar. I originally wanted to add battery operated Christmas lights around the reindeer’s antlers but I ran out of time. The reindeer’s nose was a costume light up reindeer nose. I made a hole in the sweater and used a glue gun to keep the nose in place were my left breast is located. The reindeer’s smile, the slightly popping out eye, and were the nose is located makes it a perverted ugly Christmas sweater. What I like about my sweater is it is not obliviously perverted. Our friends’ kids thought it was cool how it jingled and lit up.

Below are links to my other eleven Creative Christmas homemade gifts, just in case you missed some. 

Twelve Days of Creative Christmas: Day 1

Twelve Days of Creative Christmas: Day 2 

Twelve Days of Creative Christmas: Day 3 

Twelve Days of Creative Christmas: Day 4 

See You Next Year / Day 5 of Creative Christmas 

Day 6 of Creative Christmas: Married Christmas 

Day 7 of Creative Christmas: A Thrifted Gift 

Day 8 of Creative Christmas: Little Monster Scrapbook 

Day 9 of Creative Christmas: Embroidered Oven Mitt

Day 10 of Creative Christmas: From Belle 

Day 11: DIY Engraved Tree Style Frame 

Thanks for joining me in my creative shopping making spree for family and friends for Christmas 2012.
Related Posts Plugin for WordPress, Blogger...