October 3, 2017

DIY Bobs Burgers’ Linda Belcher Footprint Art

Alriiight! First, I would like to wish my dear friend and partner in crime in co-hosting Bee Creative Swaps, a very Happy Happy early Birthday! I hope you have a wonderful birthday on your actual birthday, Emily!

I decided not to participate in the Animation Celebration Swap that Emily and I are currently hosting. I wasn’t sure if I would have the time or energy to make goodies with my due date being in October. I did, however, still wanted to make Emily something special for her birthday based on her favorite animated show - Bobs Burgers.


This is the Bobs Burgers inspired birthday gift, Lil and I sent Emily. Condiments and fake burger not included. 


Emily had included this Bobs Burgers’ cross stitch in her swap mosaic and I knew right away that I wanted to make it for her. I contacted the maker of the cross stitch pattern, StephXStitch, and I emailed her since she no longer sold the pattern on Etsy. Luckily, she was nice enough to sell the pattern to me. Thank you Steph! It was a very easy pattern to follow and I’m happy with the outcome. 


I’m not a big fan of unfinished wooden hoops, so I painted the hoop lime green. The lime green worked out perfectly because it’s one of Emily’s favorite colors and it’s the color of the Bobs Burgers building.

The hamburger socks, I found at Joann’s. They were the perfect little extra to go along with this themed gift. 


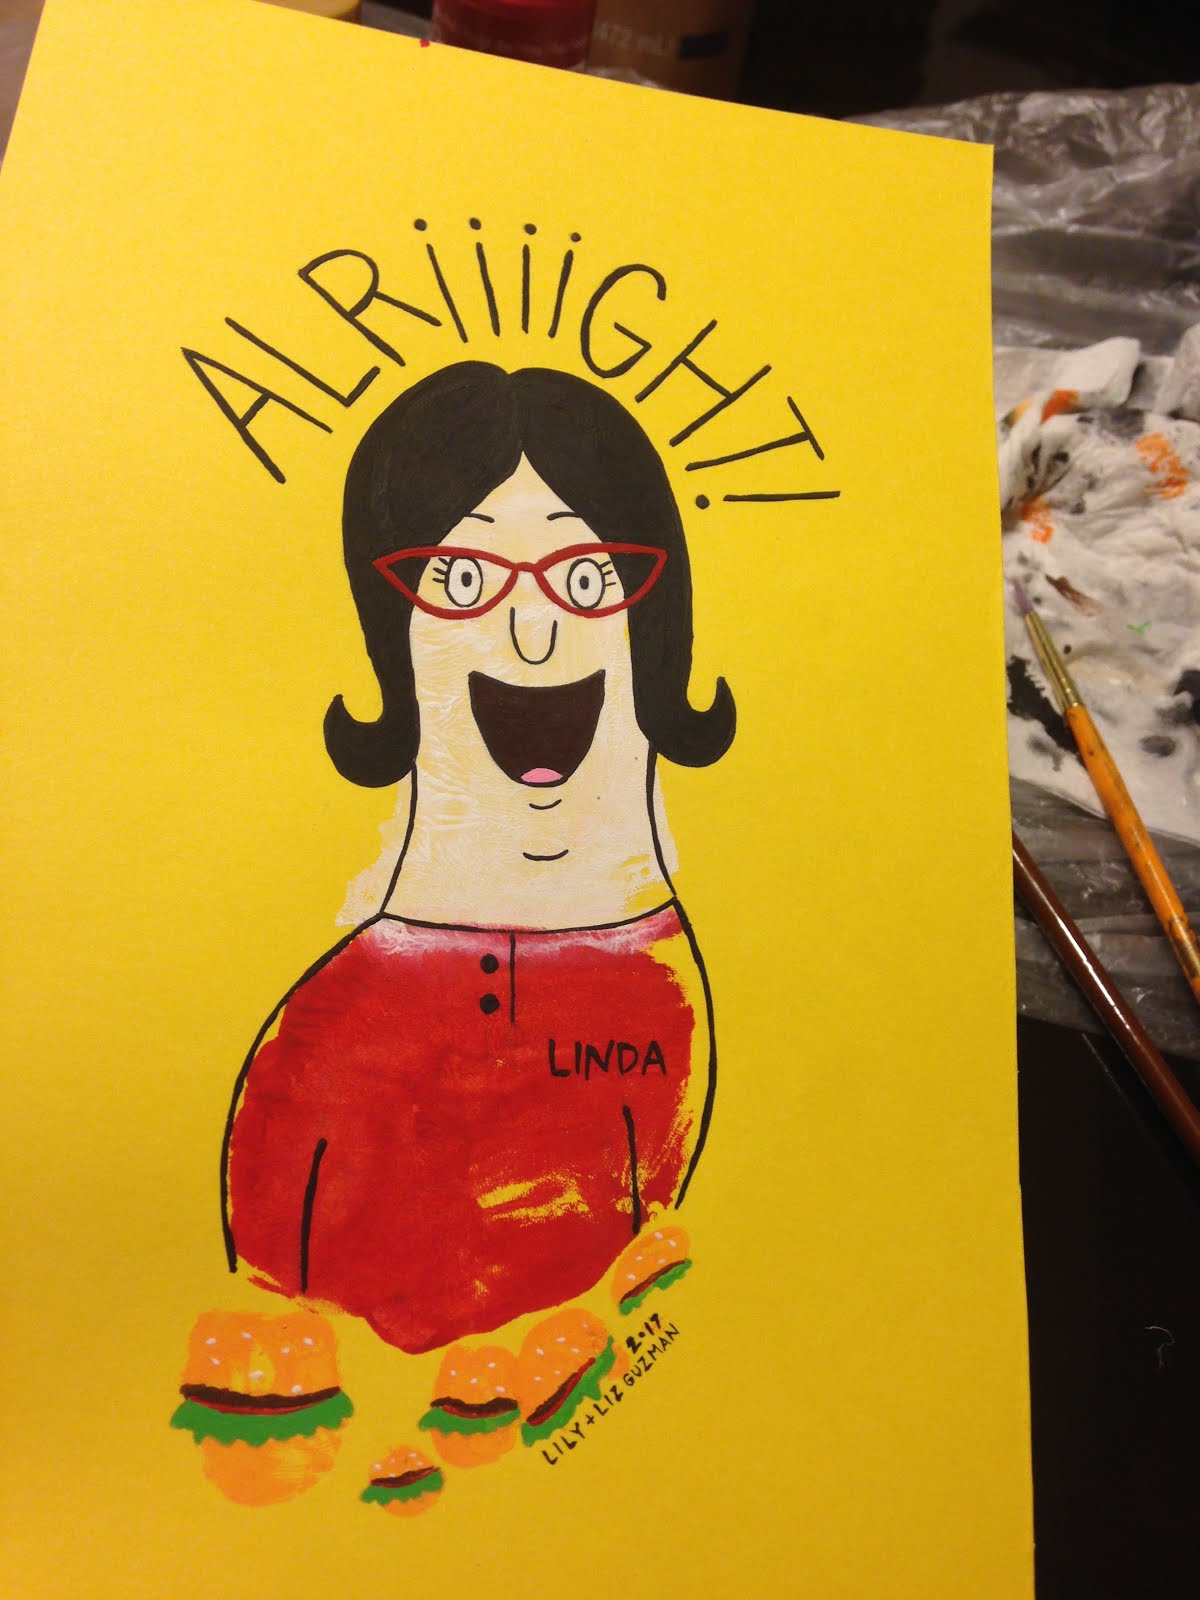
Okay, now to the fun part…Lil’s Linda Belcher’s Footprint Art.


Supplies: 
A foot (lol),
Yellow cardstock,
White, Red, Orange, Black, Green, Yellow, Brown, and Pink Paint,
Paint Brushes,
Water,
Pencil (not pictured). 
Paper towel and wipes for clean up
Sharpie Markers


Step 1: Do this part on the floor. It makes it easier to get a better print of your child’s foot. Paint the heel and a little past the middle of the foot white (Linda’s face), the rest of the midfoot red (Linda’s shirt), and toes orange (burgers).


Step 2: Let the footprint completely dry. Lil wanted to make another print with her other foot. That’s why we have two footprints pictured.  


Step 3: Lightly sketch Linda with a pencil. I pinned a lot of images of Linda on Pinterest to make sure I drew her correctly. Don’t forget to draw her signature red eyeglasses and one of her sayings, like "ALRIIIIGHT!" You can always change the toes into wine glasses instead of burgers. Perfect for someone who needs, I mean, likes wine. 


Step 4: Paint Linda. I used thin paintbrushes for the majority of this part, especially for the inside of the burgers. You can always use markers instead of painting her.


The Linda Belcher footprint is my favorite part of Emily’s gift for three reasons. First, it’s my original idea. I didn’t see it on Pinterest or copy it from someone else. Though, I bet these past three years of making footprint and handprint art with Lil was helpful in coming up with the concept. Second, the idea was all based on making a Linda print from Lil’s footprint, so I’m glad she was a part of this project. Now, Lil wants me to finish the other footprint for us to keep at home. I think I’ll add the quote, “Raising you kids is a two parent, two bottles of wine a night kind of job” quote instead. Perfect for this soon to be mother of two. Lastly, Linda Belcher is Emily’s favorite Bobs Burgers character. 


Emily received her early birthday package yesterday and she loved it. She especially loved the Linda footprint Lil made with the burger toes. 


I hope you enjoyed this Bobs Burgers themed post. Now, I’m hungry and want a burger. In and Out sounds good. 

September 26, 2017

Halloween Crafts: Fun Toddler Cards

I helped Lil make her first Halloween cards and they came out so stinking cute. I just had to share them with you and how we made one - the cat/pumpkin card. Yeah, I know, another toddler, mother assisted, tutorial. I helped Lil make three cards. We made them all pretty much the same way.

Supplies

Scissors,
Recycled Stickers (What’s left of the sticker sheet after you remove the sticker),
Crayons,
Googly Eyes (Everything is more fun with google eyes),
Blank Card (I got Lil a 50 pack of blank cards at Michael’s, last year, to make footprint and handprint birthday cards),
Glue Stick,
Stamp Markers (Purchased at Target’s dollar aisle). 


1) Have your toddler stamp the blank card first. Lil couldn’t get a good stamped image from the stamp markers so I had to help her. They’re not the best stamp markers because they are small but they do the trick for a dollar.

2) Cut around the recycled stickers and place them on the card. I cut a group of pumpkin recycled stickers. I showed Lil how to make a pumpkin face on one of the pumpkins. I was thrilled to watch her draw her first smiley faces on the pumpkins. She added stems and a leaf to each pumpkin. Then, I let Lil doodle the card. I also taught her how to draw a bat. She drew two bats, flying near a full yellow moon she doodled. 


3) Embellish with regular stickers. I added a cat sticker on the pumpkin of Lil’s choice.


4) Have your toddler help glue the google eyes, with the glue stick. Lil has gotten better at gluing small objects because she uses a glue stick regularly, when making crafts at Preschool Storytime, at the library.

I’m sorry for not providing pictures with each step. I wasn’t planning on making a tutorial with these cards, since it was an out of the blue (totally unplanned) Halloween craft. I had so much fun helping and watching Lil make the cards; I had to share our process with you, that way you could make them by yourself or with a little artist too. 


I was going to give the card with the cat and pumpkins to a friend but I decided to keep it. Come on, the card has Lil’s first drawn smiley faces and bats. I couldn’t bare to part with it. I had Lil make another card, the one with the spider, for my friend instead. Lil made these two cards a few weeks ago. 


We have been making many Halloween themed crafts lately; Lil keeps asking me almost everyday what Halloween crafts we are going to do next. On Sunday, Lil decided she wanted to craft again before bedtime. I helped her make the candy/ghost card pictured above. Yes, I’ve created a little craft monster! 

If you missed last week's, Halloween craft post, click HERE to check it out. 


September 19, 2017

Halloween Crafts: Cat Character Jar Kit

I’m expecting my second baby in October and I don’t feel like busting out all my Halloween decorations this year; I own more Halloween decorations than Christmas ones. The idea of putting a bunch of Halloween decorations away with a newborn and toddler sounds like a bad idea. However, I did put a few decorations up that I had stored in the house, not the garage, and decided to purchase some inexpensive Halloween kits for my daughter, Lil, instead. I love kits because they included all the supplies needed to create the craft. We started making Halloween crafts last month, since I don’t know how I will be feeling the closer my due date gets. 


The first Halloween kit I purchased was this Black Cat Character Jar Kit from Target. I found it in the dollar section at Target, which I hate because I always get in trouble in those aisles. I cant resist the deals and cute stuff! I purchased the kit for $3. They also have a pumpkin, monster, mummy, and sugar skull jar kit too. Lil picked the cat one and I got the sugar skull for myself.


The instructions provided were very easy to follow. This is kit ended up being a two day project since we had to wait for the black paint to dry completely before adding the cat face stickers. Lil added the cat ears first (as the jar soaked in warm water to remove the label), then painted the jar, and stuck the cat face stickers the next day.


I must admit while helping Lil with her cat jar kit, I was getting a bit frustrated because she wouldn’t listen and was putting stickers wherever she wanted. It wasn’t turning out to look like the cat jar in the picture. For example, the cat’s ears weren’t positioned right. Obviously, I had to remind myself she’s just a toddler. Most importantly, I realized by letting her do her own thing it made her cat jar more unique. I absolutely love how one of the cat’s eyes is crocked; it gives the cat character. Doing crafts with Lil has taught me to be patient and forced me to move perfectionism gradually to the side.

Lil loves making crafts. I have been making art with Lil from the very beginning, with footprint art. I’ve always known that not only is being creative with my kid fun but it is also beneficial. I just didn’t know exactly in which way until I read “Why Art and Creativity Are Important” on Parents.com. I was thrilled to learn, Lil was improving her fine motor skills just by manipulating the paintbrush when painting her jar black. I also liked reading that by letting Lil do her own thing, putting the cat face stickers were she wanted on the jar, she was reaping big rewards. Creating art and learning new nursery rhyme songs helps boost Lil’s self-confidence. Every time her dad comes home from work, she can’t help but show off her new creation or sing the new song she learned. 

Currently, Lil’s cat jar kit sits on a table, in our small living room area, along with other Halloween decorations and Halloween picture frames. I gave Lil a LED tea light candle to put inside her cat jar since she didn’t over the jar completely with black paint. Her cat jar looks awesome at night, as the light shines through. She enjoyed making the Cat Character Jar Kit so much; she asked me if I could get her the monster jar kit and get her dad the pumpkin one at Target. The following week, I did. 

Hopefully, if time permits I can share the rest of the Halloween kits Lil and I have completed. 

May 9, 2017

DIY Customizing Toddler Doodle for Mother's Day

I love giving close family and friends homemade gifts and I found a great way to incorporate my toddler's doodles by making these awesome custom word/name picture frames. Currently, my daughter's favorite new art medium is markers. I try to get her to use different mediums, for example  crayons and markers. Sometimes she does, but she really likes working with just markers right now, especially the scented kind. Making these custom picture frames are my favorite gift I help Lily make. With Mother's Day just around the corner, these custom word/name picture frames would make the perfect Mother's Day gift.


Supplies
White and Black Card Stock Paper, 
Paint, Crayons, or Markers (or all three),
Black Frame (I get mine at the 99 cent store),
Scissors,
Scrap Paper,
Pencil,
X-Acto Knife, and
Cutting Board.


Step 1: Have your child doodle on white card stock paper. I give Lily at least a week to finish a doodle. It goes faster if she is using paint. She's a toddler, so sometimes she can't sit and doodle for a long time. I give her a week because she doesn't doodle everyday and the more she doodles on the paper the more the cut out word/name will stand out. Avoid letting your child use black markers because it will end up blending in with the background when you insert the black card stock paper, at the end.

On a side note, I found this great article on the importance of having your child doodle.  Click here to read it. ]


Step 2: Grab your frame and remove the backing leaving the actual frame and glass only. Move it around the doodled paper until you find a background you like.


Step 3: Trace around the glass with a pencil. Then cut it out.


Step 4: Using your scrap piece of paper draw out the word/name you want. Cut it out and arrange it on your doodled paper. 


Step 5: Trace the letters that make up the word/name on your doodled paper.


Step 6: Place your doodled paper over a cutting mat and very carefully cut out the traced word/name with an X-Acto knife.


Step 7: Use the doodled paper to trace over the black card stock paper. Cut it out and insert it behind the white paper. Put the frame back together and TA-DA you're done! 

I have helped Lily make 4 of these custom word/name picture frames for very close family and friends and every recipient has absolutely loved it. When we made one for my parents, my brother suggested I cut out Lily's name on the doodled paper, that way they could display it near her photographs. Other good Mother Day themes for Grandma's would be Nana, Grammie, Grandma, I Love You (use the shape of a heart for love), or any other special word Grandma uses. 

I have been wanting one of these frames for myself and I hope I can finally get Lily to make me one for Mother's Day. I think I want my picture frame to say Mama. 

Please let me know if you find this tutorial useful. Better yet, let me know if you try it out with your child. 
SaveSave

April 14, 2017

Friday Frida Favs: Thank You Frida Swap Giveaway


Congratulation to mydarlingplanner, from Instagram, for winning Bee Creative Swap's Frida Pin Giveaway! 

The next giveaway will be the Thank You Frida Swap Giveaway. It will be held throughout the whole Viva La Frida Swap. This giveaway is open to Frida swap participants ONLY. This is another perk for joining the swap, as well as receiving discounts from six Etsy sellers from my "My Frida Wish List on Etsy 2017" post.  This giveaway is very easy to enter, since it's stuff that is already expected of you as a Viva La Frida Swap participant. To enter you must submit all your check-ins on time, without Emily or I having to contact you because you are running behind.

Below are the Instagram check-in dates:
April 15th: Mosaic Photo Check-In (due tomorrow)
May 1st: Material Check-In
May 15th: Sneak Peak Check-In
June 1st: Sneak Peak Check-In
June 15th: A photo of your boxed up items, shipping receipt, or other proof of shipment
Don't forget to use the #vivalafridaswap2017 when posting your check-ins on Instagram.

Even being one day late posting your check-ins will unfortunately disqualify you from the giveaway. This giveaway is our way of saying, "Thank you" for making our job as swap hosts a little easier. 


I have collected two Frida inspired items for this giveaway and I hope to include a little something made by yours truly. Currently, the giveaway prizes include the second Frida Kahlo pin donated by Badges by Ryan and a Viva La Vida Frida vinyl sticker from Mis Nopales Art. Both items are from Etsy sellers. I purchased the Frida sticker from Kick Stater to help with Mis Nopales Art's Frida campaign. I'm a big supporter of helping fellow artists.

I love seeing the Frida Kahlo themed mosaics posted on Instagram so far. Click here to see the mosaics posted. Of course, my favorite part will be seeing the wonderful crafts created that are inspired by Frida Kahlo.

I hope we have many entries for the Thank You Frida Swap Giveaway. Don't forget, your first check-in is due tomorrow. Good luck and happy crafting!
SaveSave

March 31, 2017

Friday Frida Favs: Frida Kahlo Perler Beads

Have you heard of perler beads, seen projects done with them, or used them yourself?

What are perler beads you ask?
The Beginner's Guide to Perler Beads, says "Pearler beads (as know as Hama beads or Nabbi beads) are plastic fusible beads. These colorful beads are usually arranged on plastic pegboards to form patterns and then fused together with a clothes iron. They can also be strung into necklaces, woven into keychains, or even assembled into three-dimensional decors."

I tried a small pearler bead kit a few years ago, but didn't really get into them until I did a Disney Pixar craft swap last year and a huge woodland critter kit for my daughter's advent calendar for Christmas. 

The process of using pearler beads reminds me a lot of cross stitching. In cross stitching you use thread to make little x's to make a pattern. The same concept applies to using pearler beads except you're using beads. If you make a mistake, you can easily move the beads around. Something I like about using perler beads. However, once you iron your pattern, there's no turning back. The only thing I don't like about using perler beads is that with any slight pump the beads come off the pegboard. Since they move so easily, I've learned to take lots of close-up pictures while using perler beads. That way if they come off the pegboard, I can look back to the photos to see were they belong. 


On Wednesday, while looking for a card in my cards/stationary tote in the garage, I found the remaining perler beads from the Disney pixar project. Perler beads can be quite addicting. I spent the last hours of Wednesday night and welcomed Thursday (I was up til 2:30 am) designing my own Frida Kahlo, watermelon, cactus, a pink sacred heart (as a type this, I'm realizing I need to add a flame at the top of the heart), a paint palette, and a paint brush. 

(source

On Thursday, while my daughter napped, I searched for Frida Kahlo perler beads on Pinterest for inspiration and I started adjusting my Frida Kahlo pattern around. Frida's head wasn't square anymore. I gave it a more rounded shape.


Instead of Frida's unibrow being completely straight, I curved it by moving the middle black perler bead down.


I changed the flowers in Frida's hair numerous times and decided that I liked Frida with bight pink checks instead of peach colored checks. 


While taking progress pictures, I learned to take photographs from a distance because you get a better feel of how the pattern will look like once fused together.

Now, I just have to add flames to the pink sacred heart and iron the Frida inspired perler bead patterns, that I designed. Hopefully, I can find a square or long rectangular frame to display them in.

Tomorrow is the last day to sign up from the Viva La Frida swap, click here to sign up, and the Frida Kahlo pin giveaway. As a perk for signing up, you'll receive discounts from Etsy shops that sell Frida Kahlo inspired items. For more Frida inspiration, check out Emily's blog by clicking here.


March 24, 2017

Friday Frida Favs: Frida Kahlo and the Bravest Girl in the World Book Review

I would love to one day have a small collection of Frida Kahlo books, especially ones meant more for children and young adults since those seem to be the ones filled the most with beautiful illustrations. We currently own two Frida Kahlo themed books, "Frida" by Johan Winter and Ana Juan and "Counting with - Contend con Frida" by Patty Rodriguez and Ariana Stein. While searching for Frida Kahlo books at my local library's search engine online, I came upon the book, "Frida Kahlo and the Bravest Girl in the World." I requested to put it on hold for Lily and I and fell in love with it the first time I read it to her.


"Frida Kahlo and the Bravest Girl in the World," by Laurence Anholt is about a little girl named Mariana who gets her portrait painted by Frida. Mariana learns a lot about Frida, life lessons from Frida, and develops a life long friendship with Frida. Frida's interactions with Mariana gives the reader a glimpse of the wonderful mother Frida would have been if she could have had children. The illustrations in this book are beautifully painted; illustrations that both adults and children would appreciate. "Frida Kahlo and the Bravest Girl in the World" book would be a great addition to any girl's library as they "discover how love, creativity, determination and above all - courage - can give them wings to fly" (quote obtained from last page in book, short biography on Frida Kahlo).


Among the beautiful watercolor illustrations in this book, some of Frida Kahlo's actual paintings are included, like the portrait shown above of Dona Rosita (Mariana's grandmother). An artistic touch I love and haven't noticed to have been done in other Frida Kahlo themed books.


Not only was Frida an unforgettable painter but she has a great sense of humor too. Frida introduces Mariana to her pets, some whom are very uncommon pets. Frida pets included a monkey, parrot, dog, baby deer, and an eagle named Gertrude Caca Blanca, which means Gertrude White Poo. Frida makes fun of her "favorite friend of all" her husband Diego River when describing him to Mariana. She calls him an ugly frog-toad and big as an elephant (which I already knew Frida did), who is always hungry. Frida even reveals personal information about Diego that had me laughing when reading the book to my daughter. Diego has to get his underwear specially made "big enough for an elephant" and they're pink. Diego is like a big baby who plays with toys in his bath. Ha! Who knew!?! I think Frida reveals this information to Mariana to make her feel comfortable around Diego.


Frida is constantly reminding Mariana that no matter what life throws at her she can be still be strong and be whomever she wants to be in life. This constant message makes this book one of my favorite Frida Kahlo themed books. Frida explains to Mariana why she wears long dresses (the bus and tram crash) and how she began painting. The accident may have broken Frida, but it didn't break her spirit, it only made her stronger.


Frida also tells Mariana, "We are stronger than we think Mariana. And here's a little secret - women are stronger than men."

Frida quickly influences Mariana. Frida gives Mariana a skeleton toy doll and Mariana tells the doll, "Listen, Boney. I'm the bravest girl in the world."

When Mariana says farewell to Frida and Diego, Frida tells Mariana, "Promise me you'll be strong like me, Little Sister. Promise me you'll fly in your life." This quote is one of my favorite in this book because it helped me better understand one of Frida Kahlo's most popular quotes, "Feet, why do I need you when I have wings to fly."


At the end of the book, there's a short biography of Frida Kahlo that you will enjoy reading as much as the actual book. In it, it tells that Frida and Mariana developed a lifelong friendship.

If you think you'll love, "Frida Kahlo and the Bravest Girl in the World" as much as Lily and I did, you can get your own copy at Book Depository for $12.00 with free shipping. I'm a bargain shopper and this is the best deal I could find online. The regular price for this book is $16.99. I hope to add this book to Lily and my library in the future. 

Here's a fun surprise from Lily and I to my fellow bookworms and Frida Kahlo admirers - two free downloadable book marks:


You can print them out for your Viva La Frida Swap partner and for yourself.  If you haven't sign up yet for the swap, click here to do so.  For more inspirational Frida Kahlo posts head over to Emily's blog here. Also, don't forget to enter the Frida Kahlo pin giveaway! Click here for more information on the giveaway. 


March 17, 2017

Friday Frida Favs: Frida Kahlo Enamel Pins

I become obsessed with Frida Kahlo enamel pins last year, when I purchased one for my Viva La Frida swap partner and myself. Since then, I have decided to collect a Frida Kahlo enamel pin for each year Emily and I host a Viva La Frida swap, in honor of that year's swap. While searching through Instagram using the #fridakahlo and on Etsy, I found lots of Frida Kahlo enamel pins designed by many talented artists.


One of those talented Etsy artists is Ryan, from Badges by Ryan. I featured his Frida Kahlo enamel pin on my first Friday Frida Favs post for this year, "My Frida Wish List on Etsy 2017." Ryan is a very generous person who has donated one of his awesome Frida Kahlo pins for Bee Creative Swaps to giveaway.

To enter you must:
- Be a Viva La Frida Swap participant (click here to sign up).
- Follow Bee Creative Swaps Instagram account
- Like the Frida Kahlo Pin Giveaway post on Instagram.

Extra Entries:
- Leave a comment on Bee Creative Swaps Instagram with your favorite Frida enamel pin from the ones featured below.
- Post your mosaic up early using the #vivalafridaswap2017

Contest closes April 1st.

Below are some my favorite Frida Kahlo enamel pins. Don't forget to choose your favorite Frida pin for an extra giveaway entry.


Visit our Frida Kahlo pin giveaway provider and show his Etsy shop some love!


The Found Retail:


Product Your Magic:


Which is your favorite Frida Kahlo enamel pin? Share your thoughts with us here, for a chance to win a Frida Kahlo pin. Wouldn't it be great to win and have a Frida Kahlo pin to remember your participation in this year's Viva La Frida Swap!?! 

Can't get enough Frida this Friday; stop by Emily's blog, The Morose Bee, for another dose of Friday Frida Favs. 

SaveSave
Related Posts Plugin for WordPress, Blogger...